If you’ve purchased a computer recently, you may have noticed that it didn’t come with a physical recovery or installation disk for your operating system. Most manufacturers have stopped providing these disks to both reduce costs and prevent piracy. However, if your operating system won’t boot or you need to troubleshoot problems, you’ll need recovery media to fix it.
Most computers do allow you to partition your hard drive or designate an extra one as a recovery drive, but if your hard drive is causing problems then that recovery will be useless. Creating a separate recovery on a USB/flash drive is a more reliable way to ensure you’ll always have access to your troubleshooting media. It is always better to be prepared by making your own now than waiting until you actually need one!
Luckily, it is a simple process for all operating systems including Windows, Mac, Linux, and Chrome OS. We recommend using a flash drive versus a CD/DVD. Many new computers don’t include an optical (CD/DVD) drive anymore, so having a recovery USB stick will ensure you can use it with any style of computer or notebook.
WINDOWS 10
From your taskbar, search for then select “Create a recovery drive”. Enter an administrator password if prompted.
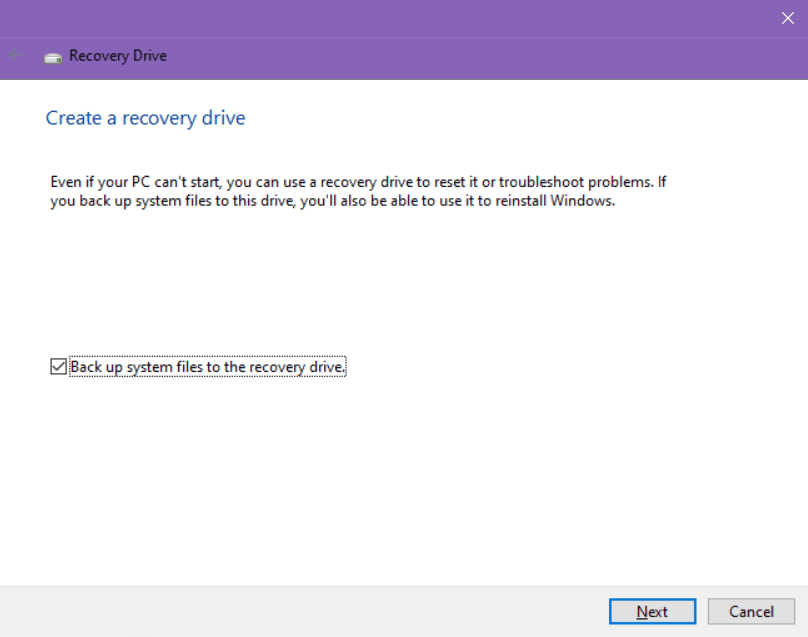
When the tool opens, ensure the “back up system files to a recovery drive” option is checked and click Next.
Connect a USB drive to your PC that is as big as or larger than the recommended size Windows displays. Make sure this USB drive is dedicated to your backup only as any files currently on it will be deleted during the backup process.
When it’s done, you might see a “Delete the recovery partition from your PC” option on the last screen. This is mainly personal preference and can be selected if you’d like to free up some space on your hard drive. Otherwise, click Finish and you’re done.
WINDOWS 8/8.1
We’ll be using the Recovery Media Creator software that is already on your machine.
Tap the Windows key on your keyboard to get to the Start screen, type “Recovery Drive”, and press Enter to open the “Create a recovery drive” tool. Alternatively for Windows users with the Classic Start menu, simply open the Start menu, type “Recovery Drive” into the search bar, and open the wizard.
Insert your flash drive into a USB port and follow the steps in the wizard onscreen to create your recovery drive, similar to the steps above for Windows 10.
This tool also gives you the option to move your recovery drive from your hard drive to the USB drive, thereby removing it from your system drive on the computer where it is stored. This can help free up disk space on devices with limited storage.
Just keep in mind that you will need the USB stick to refresh or reset your PC in the future, should you choose to move it.
WINDOWS 7
For Windows 7, you will have to use a CD/DVD to create your recovery media as it won’t allow using a USB/flash drive. However, the process is still very similar to creating a recovery on Windows 8/8.1.
In Windows 7 it is referred to as a System Repair Disc and will allow you to access tools like Startup Repair which can fix problems keeping your operating system from booting.
Begin by again pressing the Windows key to open your Start menu (or click the Start button in the lower left-hand corner of your desktop), type “System Repair Disc” in the menu search bar, and press Enter to open it. Ensure you have a CD/DVD in your optical drive, and follow the steps in the wizard onscreen to create your repair disk.
MAC OS X
Apple computers use OS X Recovery which includes tools to reinstall the operating system, restore from a Time Machine backup, manage your disks, and more.
Modern Macs even support Internet Recovery so they can download the OS X Recovery software from Apple’s servers when needed, eliminating the need for a recovery drive in most cases. These features are integrated into the Mac’s UEFI firmware, so it can download and use the recovery tools even if your hard drive is completely wiped. Pretty cool, but you’ll need internet access to be able to use these features.
It’s a good idea to create a recovery drive just in case you are unable to get on the internet when you need to use these programs, or if your Mac doesn’t come with Internet Recovery.
To begin, you’ll need to download the OS X Recovery Disk Assistant from Apple’s website. Run it and select an external drive to install the recovery software to (be sure to have your USB stick inserted into the computer), and follow the onscreen instructions. You’ll then be able to boot any Mac while holding the Option key, selecting the recovery drive, and accessing the recovery environment from this flash stick.
LINUX
With Linux installations, there is no need to create a separate recovery drive. You can simply keep a bootable USB drive, SD card, DVD, or CD with your Linux distribution’s live environment on it, which includes all available troubleshooting tools already.
If your distribution ever becomes damaged and unbootable, simply insert your live CD or drive and use the included tools to fix the problem.
CHROME OS
With Chrome operating systems, you can actually create a recovery drive using any operating system, not just the Chrome OS, as long as the system has Google Chrome installed.
Install the Chromebook Recovery Utility from the Chrome Web Store, insert at least a 4 GB USB stick or SD card, and select your specific Chromebook model during the prompt. This program will create a recovery drive with all of Chrome OS’s system files on it, and will allow you to reinstall the entire Chrome operating system if ever needed.
Note that your software will only work for the model number you entered during installation; if you need to use the software on a different model Chromebook, the appropriate version will need to be put onto a flash drive or SD card.
HOW TO USE YOUR RECOVERY DRIVE
To boot to any recovery media, simply insert your USB drive, CD/DVD, etc into the computer and reboot/power on.
Before you boot, if you haven’t previously you’ll want to make sure your computer’s boot order is set properly so that your computer knows to search for the drive and access the recovery media on it, instead of attempting to boot from the hard drive to the desktop like normal. This is changed in your computer’s BIOS (Basic Input/Output System) which is a set of computer instructions loaded on every system that controls input and output operations, mainly to initialize and test hardware components before boot and control some system functions.
During startup, somewhere onscreen will be instructions on which key(s) to press to access your computer’s BIOS menu. While “delete” and “F2” are two of the most common BIOS buttons, it varies for each computer. If you do not see the option onscreen while your computer is booting, consult your manual or search your computer’s model number plus “bios key” in any search engine.
Once you are in the BIOS menu, you’ll need to look for the “Boot” menu option. Keep in mind all systems will look different. Sometimes “boot” will be its own separate menu, but sometimes it will be contained within another section. Keep looking until you find a section that contains boot options/configuration/priorities/order.
Use the arrow keys to navigate through the menu, and press “Enter” to select or change something. Locate a boot order screen that lists the boot devices. These will generally include your hard drive, the CD/DVD drive, USB drive, and possibly more. You will have multiple slots to arrange the boot order however you need it.
To access your recovery media, put the drive that contains your recovery media as boot option #1; for example, with a CD/DVD recovery disk you will want to select your CD/DVD drive as first in the boot order. The computer will attempt to boot from the devices in the order that is selected until it finds a device with bootable media. Once you have your boot order properly set up, save changes and exit the BIOS. The computer should then reboot and recognize your attached recovery media.
When you are done using your recovery media, use the same process to set your boot order back to normal, or whatever your desired order happens to be.
Boot menu
Some computers will give you a “boot menu” option. This bypasses having to navigate through the entire BIOS menu and simply takes you straight to the boot order option. From here, you can easily select the drive you want first in the boot order, save your changes and restart.
Your computer will display the appropriate key to press during startup, if you don’t see the option then consult your computer manual or any search engine.